Monday, September 26, 2022

49 and Market Vintage Artistry Serenity - 4 ways with 1 photo!


Hello! I have been working with 49 AndMarket - Vintage Artistry Serenity. Such a gorgeous collection! I challenged myself to create 4 different layouts for each of their scrapbooks with the same “back to school” photo with this line. I tried to create a different mood in each, with different colors, embellishments, and designs. (I have created links in the store to products I used. Go ahead and click on them!)


The first is for the oldest, who is in Grade 11. Along with the ephemera pieces for layering, I used the 12x12 Sentiment Rub-Ons for my title. I let the Tim Holtz Small Talk speak for me with journaling phrases. I used Distress Oxide in Gathered Twigs to help them blend with the rest of the layout.

For the second layout, I used Distress Oxide Gathered Twigs to stencil some depth in the background. This is another layout that I didn’t want to use feminine embellishments on, so I looked for something different. I found this ladder in the laser cut outs and imagined it symbolizing climbing to the top. Again the Sentiment Rub-Ons were used to create the title. The notebook where I put the journaling and the tag are both chipboard pieces and were inked along the edges with the Gathered Twigs.

For the third layout, I used DistressOxide Uncharted Mariner to ink up my torn edges on the patterned paper. I rolled out the 2” newspaper washi tape onto my craft mat and colored it with the same distress oxide color before mounting it onto a black strip of cardstock. The tickets and leaves were treated with distress on the edges and then layered under my popped up photo.  The journaling block is from the ephemera pack and I inked up more sayings from the Tim Holtz Small Talk to add as well. I used another word from the Sentiments Rub-Ons and cut out “the” and “day” from other sentiments on the sheet to complete the title.

The last layout in this group is a little more feminine, but not overly so. My granddaughter is in Grade 4 and the flowers on this patterned paper suited the photo perfectly. I used my exacto knife to cut around the blooms and butterfly on the left of the photo so that I could tuck it behind them and used a laser cut bouquet of blooms for the right side. This time, I added foam Thickers to the sentiment rub-ons for the title and put my hand written journaling right on the background. I mounted this onto a shiny blue cardstock to give it a bit of shine, while the layouts for the boys were more muted.

As always, I finish up my crafting sessions with a few cards, and I will continue to use the 6x8 patterned paper pad for more. The quality and sturdiness of this paper is perfect for cardmaking.

For the first card, I covered a sheet of cardstock with 2 strips of the thick washi tape and mounted it on blue cardstock then popped it up on foam. A little piece of ribbon finished it off nicely.  The next card is a die cut panel and I used a small strip of the thick rose washi and a sentiment from the Pinkfresh Studio Foiled Sentiments ephemera pack. It’s so quick and easy to find a suitable saying in these packs! A few Studio Katia pearls and it was done.

The next cards were made with the 6x8 papers. One just needed a simple stamped sentiment and the other used another of the rub-on sentiments along with a die cut word and a bit of stamping.

The last card for this post is a shaker card, embellished with laser cut butterflies from the collection and a Pinkfresh Studio Stitched Scallop Circle die. The Happy Birthday sentiment die is from CreativeExpressions and is easy use!

As always, if you are interested in something that is no longer in stock in the store, just send Sandy an email and she will be happy to get it in for you.

Thanks for stopping by!


Originally published on the Scrapshotz.com blog on September 26, 2022.


Friday, May 6, 2022

Cocoa Vanilla No Limits - Scrapshotz Kit for April 2022


I was thrilled to be able to work with the April Scrapshotz kit featuring the No Limits line from Cocoa Vanilla! This line is perfect for sport photos as well as almost any other event that life presents. I used it for this double page spread of my grandsons hockey season.

The title on the left side of the layout is from the chipboard embellishments. I wrote the journaling on a pocket card and the stars and banner are also from the 12x12 chipboard sheet.

The big titles on this side are from the Die Cut Titles. There are so many to choose from in this package! The stars and circle embellishments are from the Die Cut Ephemera package, and the word banners are from the 6x12 Accessory Stickers.

I had to use the paper from the paper stack to make cards! This big die cut was cut from the patterned paper with a Lawn Fawn die that is in the store here Big Hugs. I backed it with a second die cut in black and used small chipboard embellishments along with some Ebony Black Crystal Nuvo Drops that are in the store. This card would work for so many things.

For this card I used some starry patterned paper and a pocket card with some stickles on the letters. So colorful and easy! The stars are from the Die Cut Ephemera pack and got a Stickles treatment as well.

This card uses a sentiment from the Die Cut Ephemera package and word strips from the 6x12 Accessory Stickers. I used foam squares to pop up the sentiment and puffy stars to highlight the word strips.

Thanks for looking! I will be back later this week with more projects from this awesome line.


Originally published on the Scrapshotz blog, May 2, 2022


Tuesday, September 21, 2021

Photoplay "Crafting With My Gnomies"

Hello! I am pleased to be sharing projects created with the Photoplay "Crafting With My Gnomies" by Becky Moore. Often at crop events, I get so busy that I forget to take photos, but knowing that I have such an awesome line to scrapbook these photos will likely inspire me to take more.

The photos on these layouts are from the Calgary Crop & Create in April 2019.The first layout features a mix of the patterned papers layered in the center of the page. It has some popped up stickers and cut apart cards in 4x6 and 3x4. 


I stamped and colored a gnome from the cute stamp set and fussy cut him out to pop up, too.
The second layout is fun, using a lot of stickers, most of them popped up. I matted the patterned paper in the center to give it some separation from the background pattern. I used American Craft foam Thickers for my title.
 

I used Lustre Polish with the Hearts stencil to create the background for this card. Stickers and ephemera were popped up decorate it and convey the sentiments. It will be perfect to send to a crafty friend!

This photo is from 2016's Crop & Create and I am happy to finally get it on to a page! This collection is bright, beautiful and I love the black in the patterns. I matted my background paper with both black and white cardstock. I also matted the striped paper banner with black. 

I used my name tag from the event as an accent and stamped and colored a gnome in the colors of the paper. The title was stamped and die cut from a Scrapbook and Cards Today set.
The card on the left below was created with scraps of patterned paper and a bit of twine. I love that sweet gnome. The card on the right showcases the Handmade with Love stencil. Distress Oxides were used on this great stencil and I popped up some ephemera and a sticker to finish it off.

Thanks for stopping by!

 Originally published on the Scrapshotz blog on September 21, 2021

Tuesday, May 18, 2021

Altenew "Enjoy the Ride"


 Hi there! I was so excited to get the Altenew Enjoy the Ride Scrapshotz kit to play with!The vibrant colors of this kit reminded me of tropical vistas and I looked to a photo of a sunset in Puerto Vallarta. I used blooms and leaves from the ephemera pack and word strips from the chipboard elements. The edges were inked with Distress ink and the chipboard thickers were included in the the kit, too!


Then I got into using the ephemera for cards. I used some scraps of patterned paper, but also some pages from the Altenew Enjoy the Ride 6x6 paper pad that was a great add-on this month. You can still pick it up here.


 I popped up the die cuts and used Nuvo Crystal Drops on most of these. I love the drops and they find their way on to most of my cards. They were also treated to a bit of shine with the Zig Wink of Stella Clear Glitter Marker.

This card also got a little love splatter from the Dina Wakely Gloss Spray in Eggplant. The sentiment here was cut out with the Taylored Expressions Well Rounded Die.

These next cards used the Altenew Fancy Hello Die. What a bit of elegance! Their dies cut so cleanly and are a joy to put down.


Here is another layout using the awesome Enjoy the Ride line from Altenew. I  did a bit of modification with the chipboard title, cutting off the bottom words (Happy Day) to use it here. The leafy die cuts were in the ephemera pack and I like the way they break up the hard line of the photo mat. A border drawn with a black pen to frame the layout and it's complete.

I made some cards with the Altenew Mini Thanks Stamp set. I was able to use the new Tim Holtz color, Kitsch Flamingo to ink the edges of this one. I stamped the laurel leaves multiple time and popped them up below the white embossed sentiment. Topped it off with flowers from my stash and used Nuvo Crystal Drops in Carnation Pink for the flower center and accents.

This next card also used the Mini Thanks Stamp, along with a pink ribbon to highlight the pink flower centers in the patterned paper. I used green enamel dots to accent the sentiment.

I love the versatility of the sentiments in the Altenew Fancy Greetings Stamp Set. I stamped the "sending hugs" with Rustic Wilderness Distress Oxide, then used the Distress Embossing Powder in the same color to give it shine. This time the Nuvo Crystal Drops were Apple Green.

For this simple card, I gold embossed another sentiment from the Altenew Fancy Greetings set and die cut a flower from a Tim Holtz Foliage die from the photo mat before mounting my panel. I do this a lot, as no one sees under the panel anyway, and you can't let great gold foil cardstock go to waste!

What a fun line to work with! I will keep dreaming of tropical views and temperatures as we make our way through this crazy polar vortex that the prairies are stuck in. I hope you're all ready to get crafty with us tomorrow, February 19 at "The Great Scrapshotz Staycation Crop!" See you there!

Originally published on the Scrapshotz blog, February 2021.


Scrap Shotz Spotlight – P13 Free Spirit

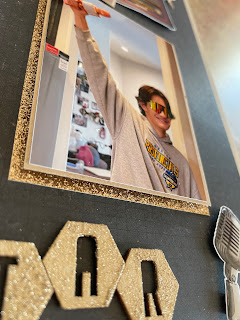
Hello! Today I have a couple of layouts and some cards created with the P13 Free Spirit line. This line has darker colors and an industrial feel to it, so it’s pretty well suited to masculine pages and cards. I used it to create a layout with a photo of my teenage grandson. I love the strip of patterned paper with the marquee letters!

I added die cut gears from Tim Holtz dies for embellishments and used foam Thickers to create the title. A simple layout for this quiet photo.

The next layout is based on the Creative Scrapbooker March sketch from their Sketchy Group on Facebook. Here is the sketch and my layout.

I followed the sketch pretty literally, only adding interest by slanting the photos and using pop dots under some of them. Some were popped up with a double layer of foam and some only one layer, so there is a variety of texture and depth. I used CosmicShimmer Glitter Kiss on the wooden alphas in the title. It’s awesome -  goes on smoothly and covers well, then doesn’t rub off when dry! Win, win and WIN!


Here are a few cards with the 6x6 patterned papers. Here I used glossy accents on the Poppy Stamps - Happy Birthday Poe Script Die after cutting out a couple of layers. Love the polished look! A trio of sequins finished the card.

This round tag is from the P13 - Free Spirit Tag Set 01 and the sentiment is Altenew - Fancy Greetings Stamp Set , stamped in black and embossed with clear embossing powder. I cut the corners on the top of the card with my WRMK corner chomper. And added some Tonic - Nuvo Crystal Drops Ebony Black to finish it off.


The last card for today is simple too, using stickers from the line in the bottom third, some twine and an black embossed sentiment pane, once again using the Tonic - Nuvo Crystal Drops Ebony Black to accent.

This line is perfect for your masculine projects! Thank you for stopping in to have a look. 

Originally published on the Scrapshotz blog March 16, 2021.


Cocoa Vanilla - Sunkissed

This line made me yearn for those warm, lazy, sunny summer days that I'm sure are on their way! I used photos from last summer to inspire you to get those fun, vibrant photos into your scrapbook!

I used the wood buttons and the stickers from the line. The title is stamped right on the layout!! Brave, right? I guess the worst thing that could happen is that I would have had to cover it if it went wrong, but yay - it was pretty effective!

Another bright layout with ephemera and thickers from the kit. I used glossy accents on the cocktails and some distress inking on the banners, as well as random foam backing. I added some messy doodling and a few enamel dots - DONE!

I loved the rainbow on this patterned paper so much that I hated to cover it. The gorgeous sparkly title words are from the line and there were so many great words to choose from. Some ephemera pieces and another super sunny photo and the layout is complete.


This trio of cards was created from scraps that were on my desk with some "Sunkissed" ephemera. Fun and easy!

Thanks for looking! I know that we'll soon have lots of beautiful summer photos to scrap. This kit will suit them to a tee!

Originally published on the Scrapshotz blog on April 22, 2021


Simple Stories - Happily Ever After

I was thrilled to be able to use this Simple Stories line for my Scrapshotz blog post this month. Our son and his bride eloped to Jasper in February, so I have so many beautiful photos to scrap! Here's my first with this gorgeous paper.

For this layout, I fussy cut the florals from the patterned paper and mounted them with some foam tape. I used a variety of stamps and alphas for my title, and doodled a frame around the photo.
To give the frame some extra interest, I doodled some flowers in the same style of blooms and embellished them and the fussy cut blooms with Nuvo drops.
 
The second layout is simple, but I used a couple of the lovely patterns from the line. The pink and gold diagonal lined paper is foiled and beautiful! 
 
To give this simple design some depth and texture, I used varying levels of foam, with some doubled up to help lift it off the page. 
 
This tape roll from 3L is amazing to use! Click on the photo to go to the Scrapshotz store to get some!
My final layout for today highlights a single 5x7 photo. I used the huge "Love" chipboard piece and cut out tags from the patterned paper for embellishments and a journaling quote. I thought that this photo was gorgeous and represented the couple looking toward their wonderful future together. 

That's it for today. Check out this great line of paper at the Scrapshotz store here:

Thanks for having a look! See you again soon! 😊

Originally published on the Scrapshotz blog on May 18, 2021.